3. Creating data (first steps)
5. CREATING POLYGONS
5b. Editing polygons
6. Preparing a print-quality map
5b. Editing your polygons
Now that we’ve created the polygons and assigned edit-able attributes to them, we can go ahead and start to edit them and complete our geologic map. Here’s how that is done:
1. Open your ArcMap project. Remember, we had to close this in order to edit the feature dataset and create the polygons.
2. If you haven’t done so already, turn off the topology layer. We’ve already managed our topology and fixed all the errors, so we’re done with this for now.
3. Add in your new polygon feature class as a new layer.
4. Wait a sec, everything is displayed as one color! Huh?
5. Don’t worry, easy fix.
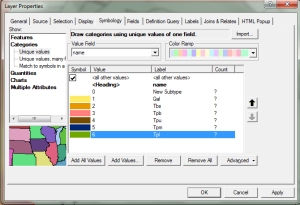
6. Double-click on your “units” feature class to open its “Layer Properties” window. Go to the “Symbology” tab. Make sure that the “Show:” window reads Categories –> Unique values, and that the Value Field –> unit name is selected. Here you can change the color of your unit polygons (same way that we changed the line symbol before editing our lines). One suggestion- When choosing a color, you are also given the option for the “Outline color” of the polygon. Since the polygon outlines are your “contacts” feature class, you don’t need any other outline. Set this to “No color”. Here’s what the window should look like once you’re done assigning colors:
One thing that I like to do personally is assign “No color” to “<all other values>” and “New Subtype”. This way, while I’m editing the polygons, I know which ones I have assigned names to (they’ll be colored) and which ones I haven’t (no color).
7. Click “Apply”, and then “OK” to exit the “Layer Properties” window.
8. Now you’re ready to start editing (naming) the polygons. Open the Editor Toolbar from the Customize menu, and select Editor –> Start Editing. Again, select your geodatabase from the lower half of the “Start Editing” window that pops up.
9. Click on the “Attributes” tab at the bottom of the “Create Features” window. This will allow us to change the type (name) of each polygon in our map.
10. The next few steps follow the figure below- make sure that they are done in order to properly assign names to your polygons.
10 (1) Using the Editor Arrow, hold down the “Shift” key to select all polygons of a certain unit from your map. You can tell a polygon is selected when it is outlined in BLUE. These selected polygons will appear in the Attribute Table.
10 (2) In the Attribute Table, use the “Shift” key to select all the polygons that are listed (the ones that you selected in the previous step on your map).
10 (3) Next to the “name” (or whatever you set the field subtype to), click on the small box to bring up the “Choose Symbol Class” window.
10 (4) In the “Choose Symbol Class” window, select the name of the unit for the polygons you have highlighted in the first step. Click “OK”. Another window may open asking if you want to change the features- You do, so click “OK” again.
Note: You do not have to edit polygons in “batches” as described here, it is possible to follow these same steps for individual polygons as well.
11. Repeat this process for all of your polygons. Remember to go Editor –> Save Edits often.
12. Just like we did with labeling the dips, you can add in labels for your unit names. Do that here.
13. When you’re all done, Editor –> Stop Editing.
14. File –> Save, just in case you haven’t already.
NEXT: Preparing a print-quality map


